The Ultimate Guide to Crawl Space Encapsulation
Every healthy home starts with a solid foundation, and in South Carolina (especially along the coast in places like Awendaw), moisture and humidity are facts of life. Crawl spaces sit at the heart of this challenge.
As the Environmental Protection Agency notes, “The key to mold control is moisture control.” Crawl spaces with high relative humidity (especially those with bare earth floors) are among the most common sites for hidden mold development.
In coastal regions of South Carolina, where humidity and groundwater stay high year-round, controlling moisture below the home is essential to maintaining structural integrity and healthy indoor air.
That’s why more homeowners and professionals are choosing crawl space encapsulation as a vital part of their building or renovation process. This guide will break down why and how to encapsulate a crawl space, what’s involved in every step, and practical advice for creating a safe, dry, and efficient home.

What Is Crawl Space Encapsulation?
Crawl space encapsulation is the process of completely sealing a crawl space from the outside environment. This means isolating it from outdoor moisture, ground vapor, and even pests that otherwise make their way inside.
For humid spots like Awendaw, where summer rains and coastal air raise the risk of moisture problems, this solution can offer long-term protection.
Why Encapsulate a Crawl Space?
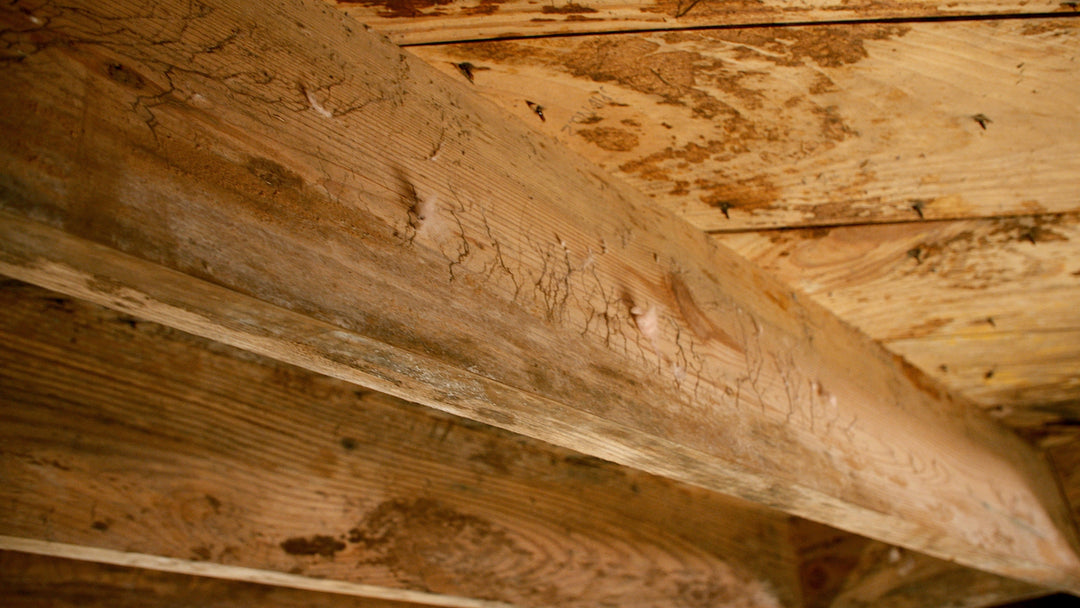
An unsealed crawl space can become a breeding ground for mold and mildew, often out of sight but never out of reach from indoor air. Mold spores and allergens rise through flooring gaps, affecting families through allergies or breathing problems.
Moisture collects on wood joists or insulation, causing rot, structural damage, and driving up energy use as HVAC systems fight constant dampness. Encapsulation stops the problem at its source by forming a barrier between the crawl space and the moisture-rich outside air.
Common Crawl Space Challenges
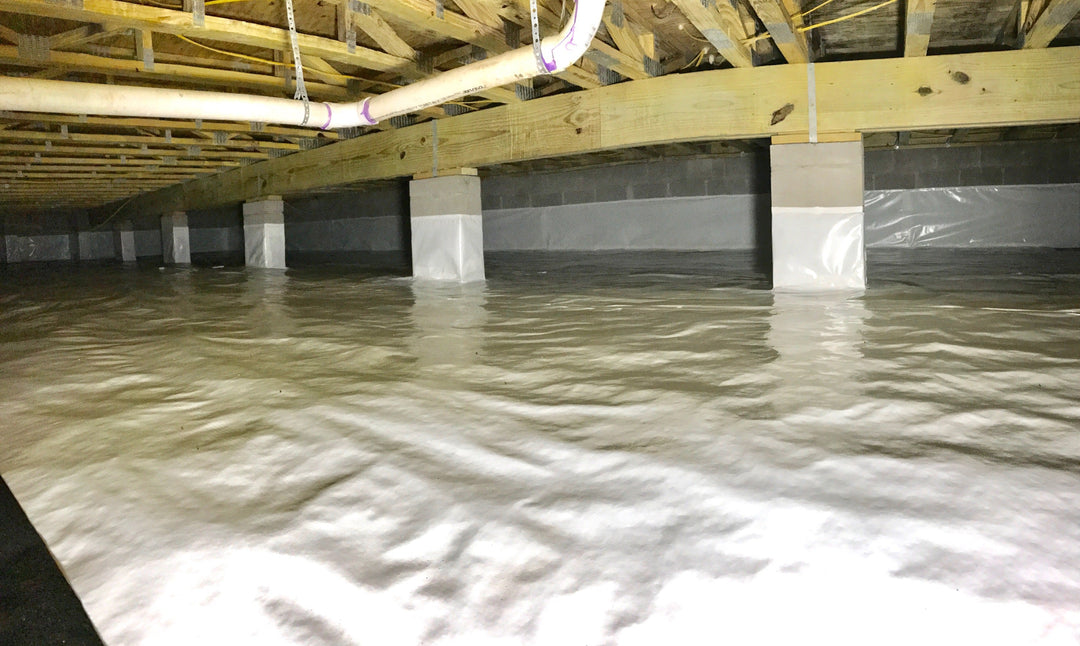
Homes in the South often sit low to the ground, with crawl spaces that collect water after heavy rain or from rising groundwater.
In Awendaw and much of South Carolina, vented crawl spaces might invite damp air inside instead of drying things out as once thought. This can bring musty odors, sagging floors, and costly repairs.
Without intervention, contractors often find themselves facing wood rot, rusted fixtures, and insulation breakdown after even a few years.
Improving Air Quality and Temperature
Once a crawl space is encapsulated, homeowners will quickly notice fresher air and steadier indoor temperatures.
By controlling vapor and sealing out drafts, encapsulation helps HVAC systems run more efficiently. This reduces the load on air conditioning and means less dust and pollen pass into living areas. That’s something anyone with allergies or kids can appreciate.
Why Should You Encapsulate Your Crawl Space?
When crawl space air and moisture are under control, the whole home stays safer, healthier, and more efficient. Here’s why proactive encapsulation matters for everyone from builders to longtime homeowners:
Preventing Wood Rot and Mold
Wood is strong, but it’s no match for South Carolina’s humidity and moisture unless it’s protected. Encapsulation stops water vapor from saturating joists, beams, and subflooring. This keeps mold and rot from eating away at important support structures, which is critical for both safety and the long-term value of the home.
Enhancing Home Durability
When the crawl space is dry and stable, everything above it lasts longer. Contractors working on renovations often see the difference between encapsulated and neglected crawl spaces: one is clean, dry, and problem-free; the other brings surprises and repair costs.
Encapsulation adds predictable life to HVAC equipment, plumbing, and wiring thanks to stable temperatures and lower humidity.
Protecting Foundation Walls
High ground moisture frequently leads to damaged foundation walls. As humidity seeps in, it drives up the risk of cracks, settling, or efflorescence—a white, powdery residue that weakens block and masonry.
Encapsulation, paired with quality drainage, relieves this pressure and helps prevent costly repairs.
Core Components of Encapsulation
To get the full benefit, each crawl space encapsulation relies on a set of proven materials and installation steps. Choosing the right product for local conditions, whether you’re battling sandy soil in Awendaw or clay farther inland, is central to long-term success.
Ground and Wall Liners
High-quality liners line the soil and walls, sealing off earth moisture and acting as the first barrier. Durable polyethylene or reinforced liners are standard. Installers make sure the wall liners extend well above ground level, overlapping floor liners and forming a sealed “bowl” around the crawl space.
Vapor Barrier Types and Uses
Not all vapor barriers are created equal. Some homes require thicker (up to 20-mil) liners with extra reinforcement, while others may use standard thickness for lighter duties. The selection depends on soil type, history of flooding, and the presence of older insulation. Tapes and sealants designed for crawl spaces ensure that seams are airtight and long-lasting.
Spray Foam and Insulation Options
Insulating the crawl space walls with closed-cell spray foam or rigid board panels helps regulate temperature and reduce condensation. This can also seal small cracks in masonry or concrete block walls.
For homeowners sensitive to chemicals, it’s important to use low-VOC and code-compliant insulation. The right insulation improves energy efficiency and keeps pests at bay.

How to Encapsulate a Crawl Space: Step-by-Step Process
Encapsulating a crawl space is a methodical process, with key points where precision and planning matter. While handy homeowners sometimes tackle small jobs, contractors often bring needed experience for complex layouts and persistent moisture issues.
Step 1: Site Assessment and Preparation
First, inspect the crawl space for standing water, leaks, mold, and any obvious damage. Remove debris, old insulation, organic material, or loose wiring.
If mold is present, treat all wood surfaces with a safe, effective cleaner and allow them to dry fully. Good lighting and protective gear are essential at this stage for both safety and a thorough job.
Step 2: Installing Vapor Barriers and Liners
Lay ground liners snugly, overlapping seams by at least twelve inches and running them up all foundation walls. Use crawl-space-specific tape or adhesive to bond the liner to the liner and the liner to the wall. Wall liner should be secured to masonry or wood using mechanical fasteners or construction tape approved for damp environments. Every gap can be a future leak, which makes attention to detail crucial.
Step 3: Sealing Vents and Controlling Temperature
Once barriers are in place, seal all exterior vents and openings. Install vent covers, sealed doors, and insulation as needed to close the system. Consider adding a dehumidifier built for crawl spaces in tougher climates. This keeps interior relative humidity below sixty percent, reducing the risk of condensation, mold, and rust.
Encapsulation Maintenance and Long-Term Benefits
Even after the work is done, keeping an encapsulated crawl space healthy calls for routine checks and minor upkeep. Owners and service pros should plan for easy, regular access to monitor conditions.
Routine Inspections and Moisture Checks
Inspect the crawl space at least twice a year or after major storms. Look for signs of water intrusion, barrier damage, or mold regrowth. Digital hygrometers help monitor humidity; moisture meters check wooden supports. Tracking both helps spot trends and avoid surprises.
Addressing Temperature Swings
Sudden changes in outside temperature may cause short-term shifts in crawl space conditions. Inspect and maintain insulation and dehumidifier function. Proper insulation around pipes protects from freezing even during rare South Carolina cold snaps, while stable humidity supports HVAC efficiency.
Ensuring Longevity of Barriers
Pay special attention to areas around access doors, pipes, and electrical runs. Seams should remain tight and intact. If tape or adhesive fails, replace it with products rated for crawl space use. High-traffic spots may need extra protection or periodic reinforcement.
Choosing Crawl Space Encapsulation Materials and Professionals
Quality of work and materials drives the success of any encapsulation job. With so many choices on the market and a range of skill levels among local providers, it pays to do some homework.
Evaluating Vapor Barrier Durability
Choose liners with a track record for strength and resistance to tears, punctures, and mold. Look for products with multi-ply construction and UV resistance for vented areas or high-sun exposures. Contractors should check for manufacturer stats and real-world testing for proper fit to South Carolina conditions.
When to Use Spray Foam or Adhesives
Spray foam excels at sealing gaps in masonry or rough concrete, especially when you need high R-value insulation. Use only products designed for closed spaces and review local building codes. For tape and adhesives, only use those rated for cold and damp installations; general-purpose hardware items often fall short.
Assessing Professional Installation Benefits
Some projects (especially ones with active moisture, pest infestations, or old damage) require an experienced crawl space professional. Ask about local references, proof of insurance, and knowledge of Upstate and Lowcountry soil conditions.
Contractors benefit from clear specifications and professional-grade tools, while homeowners should expect thorough site prep and clear post-install instructions.
FAQs About Crawl Space Encapsulation
How long does crawl space encapsulation last?
When installed correctly and maintained with care, a well-built encapsulation system can protect your home for 20+ years. The right materials and craftsmanship keep working season after season.
Does crawl space encapsulation add value to your home?
Yes, crawl space encapsulation can increase your home’s value by improving structural integrity, air quality, and energy efficiency. A sealed, moisture-controlled crawl space helps prevent issues that often lower resale appeal. Therefore, many buyers see encapsulation as a sign of proactive maintenance and long-term home health.
Will encapsulation stop musty odors?
In most cases, yes. By removing moisture and sealing air leaks, encapsulation addresses the root cause of musty smells. For homes with a long mold history, cleaning and professional deodorizing may be needed first.
Is encapsulation a DIY project?
Some skilled homeowners tackle smaller crawl spaces or maintenance. For larger, wet, or uneven sites, or when mold is present, professional crawl space help is recommended for safety and best results.
How much does it cost to encapsulate a crawl space in South Carolina?
The cost to encapsulate a crawl space ranges based on size, site condition, and chosen products. As reported by Angi, rates often run from $5,000 to $15,000 for a full system, though simple jobs may cost less.
What climate factors affect my encapsulation project?
Humidity, rainfall, and soil type shape the product and installation choices. Along the coast, vapor drive from sandy soil and flood risk mean thicker liners and better drainage are a must.
Do I need a permit to encapsulate my crawl space?
In most parts of South Carolina, a building permit is required for crawl space encapsulation, especially when the project involves electrical work, insulation, or vapor barrier installation that alters ventilation.
Always check with your local building department before starting, as permit rules can vary by county. Getting approval helps make sure your encapsulation meets code and inspection standards.
Seal Out the Moisture Under Your House
Encapsulating your crawl space is one of the smartest moves you can make to protect your home from the ground up.
In South Carolina, where salt air, heavy rain, and humidity never take a break, reliable protection is a core part of good home stewardship. Done right, encapsulation keeps rot, mold, and pests at bay, while improving indoor air quality and cutting back on wasted energy.
The difference comes down to two things: using materials built for Southern conditions and working with people who know how to install them correctly.
That’s where Your Crawl Space comes in. Our systems are designed, tested, and trusted by pros who understand the challenges of Lowcountry living.
Explore our crawl space encapsulation products and connect with our team to learn how we can help protect your home, comfort, and peace of mind.